
Sanding and Finishing Tips for Hardwood Products: Build it With Baird
Transcript taken directly from the Build It With Baird Tips for Sanding & Finishing Wood episode.
Steve Stack (00:09):
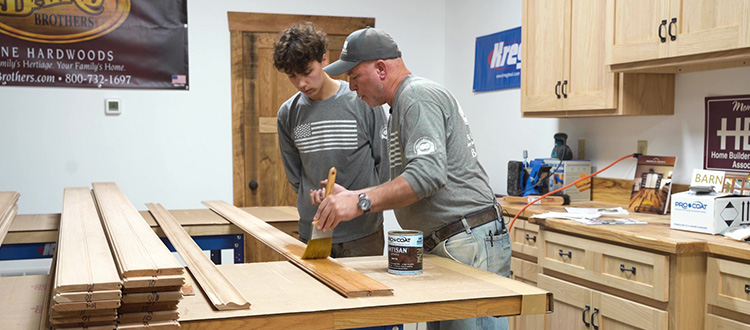
Hello everybody. Steve Stack, director of business development here at Baird Brothers Fine Hardwoods, Canfield, Ohio. We find ourselves back in our studio workshop today, and we’re going to take you through a little project. We’re going to create this outline drawing here of some of our moulding products. We’ve got some Philly fence, some crown molding, some beadboard, and we’re going to take that and eventually it’ll wind up on one of our ceilings here in the studio. But before we do that, we’ve got to do a little prep work. And today we have our material laid out and I got a great helper. I’m going to introduce you to a third-generation Baird. Come on over, I’ll show you. Dillon, hello.
Dillon Burdette (00:51):
Hi.
Steve Stack (00:51):
How you doing today, babe?
Dillon Burdette (00:51):
Good.
Steve Stack (00:51):
Good. Everybody, this is Dillon Burdette, Lori Baird’s youngest son. Today, we’re using cherry. It’s going to be one of our feature ceilings down the road, so you’re going to want to stay tuned and keep watching. We’re going to do a little sanding today, Dillon, just some details. And then once we get sanded and we tack cloth everything off, then we’re going to put a nice modified oil-based urethane coat on top of it. So, let’s go ahead and get started and we’ll take the folks through the steps and explain to them why we’re doing it. Okay?
Dillon Burdette (01:25):
Sounds good.
Correct Preparation Allows for Superior Results in Wood Finishing
Steve Stack (01:26):
All right, let’s get ready. Okay, guys. So as we can see this cherry Philly fence material. It’s a 5/8 by 5-inch face, beautiful cherry lumber. It’s gone through our mill house. They run this through the moulder and we want to accomplish somewhere between 16 to 20 knife marks per inch. And the reason that is important is that’s what accomplishes that beautiful, smooth finish.
Proper Sanding Ensures Consistency in the Grain of The Wood
Steve Stack (01:54):
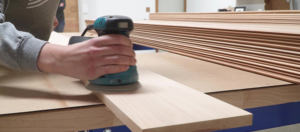
To go one step beyond, we’re going to go ahead and sand. Why do you sand? You want to minimize the knife marks, and as you can see, just in handling the boards, the bare wood will absorb oil from our hands. So we want to get rid of any smudge marks, things like that. And in handling again, we’re sliding the boards around, and that’ll put a little scuff mark on it and it closes the grain. So it’ll accept stain color differently or varnish differently than once it has a nice clean sanding. A lot of different ways to sand. Hand sanding, scratch pads, sandpaper, and there’s a ton of very affordable electrical orbital sanders, belt sanders, four-by-four palm sanders. They all work. You just have to get a feel for them.
Steve Stack (02:48):
So we’re going to be using probably all of those today, just in demonstrating to you a very simple prep that we’re to do in the sanding process, but it makes your end product come out that much more pristine. All right. So Dill, let me jump back here. And I want to get you started on this sander. It’s very easy. With the orbital sander, it does all the work and you allow it to do the work! So that’s going to be our first step, Dill. Alright?
Steve Stack (03:27):
And then, because this is a beaded tongue and groove product, we’ve got some little nooks and crannies in the profile. The same thing – it’s as simple as taking our 180 grit sand paper. Fold it. The sponges work good, too. It helps conform to the profile. But that allows you to get down into that groove and just clean that up just a little bit. And now when we go to our next step after tack cloth, and we put our varnish on there, it’s going to absorb it just like the surface of the wood board where we use the orbital. So why don’t you, Dill, go ahead and finish the end of this board. Okay, I think you got it, Dill. And as we can see… See how fine that powder is?
Dillon Burdette (04:34):
Yeah.
Steve Stack (04:34):
Okay, we’re doing a very light fine grit finish sanding, and that’s what you produce; it’s almost like facial powder quality sawdust, right? Loosen that stuff up a little bit and we’ll be ready to go. Then we’ll jump onto that next board. We’ve got a couple of things that we want to show folks, so finish this one up.
Use Tack Cloth to Remove Fine Sawdust Before Applying Wood Stain or Wood Finish
Steve Stack (05:00):
Okay, Dill, how’re you making it? Good. It looks good, man. Nice job. Nice job. All right, let’s slide that one out of the way. That’ll be one of the ones we’ll use to show how we apply the varnish. We’re to the point of we’re going to tack cloth these off. So there’s your clean cloth. It’s no more than a sticky cheese cloth, right?
Dillon Burdette (05:24):
Yeah.
Steve Stack (05:25):
But really, if you swipe… See how it picks up all that dust? And on this profile, you kind of want to align it into that bead and make sure it gets down in there and gets that dust out of there. So then while you’re doing that, Dillon, I’m going to go ahead and get our varnish ready, okay?
DIY Application of Wood Finish – Minimize Excess Stain or Clear Coat for Smooth Wood Finish
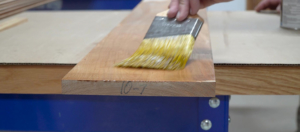
Steve Stack (05:56):
We’re putting a clear coat on it today. It’s going to be gorgeous. You know it, I know it. You’ve had it in your mom’s and dad’s home. Sometimes we’re going to have to turn the paintbrush and come down into those edges, because this is a tongue and groove product. We want to make sure that we’re covered to that tongue…Same thing on the beveled edge side. We’re going to have to address that a little bit with the edge of the brush.
And then to finish, we’ll come back and address the top. We’re dragging it out, and that lumber will grab what it wants. We’re not looking for a heavy coat, because after install, we’re going to sand it…a very light sanding. And then we’ll put that final thin topcoat on it once it’s up on the ceiling and installed. So there we go. We’re addressing the edge. It looks like we got a good amount of product over here. You’re almost brushing the point where it’s dry, Dillon. Try and get rid of all those brush strokes. What do you think? Looking okay?
Dillon Burdette (06:57):
Yep.
Steve Stack (06:57):
Give it a shot, man. We want to get as much coverage as we can. If we miss a little bit, it’s not the end of the world because we have that second coat. What do you think, Dill? How’s it look?
Dillon Burdette (07:19):
Good.
Steve Stack (07:19):
It looks good? I think it looks great! Not going to be too awful long before this is going to be a beautiful piece of wood up on that coffered ceiling, right? So I’m excited about it. I think it’s really going to be a beautiful project. So stay tuned, everybody. We look forward to seeing you next time. Till then, from Baird Brothers Fine Hardwoods, this is Steve…
Dillon Burdette (07:37):
Dillon.
Steve Stack (07:37):
And we’ll see you next time.

